Tax & Annual accounts
Digital sign
In - Digital sign, you can sign your annual report and the annual general meeting protocol digitally.
Want to keep track so you don't miss any important deadlines? See the topic What dates are important for the annual report?
This signing is only for approving the annual report and the annual general meeting protocol. The submission of annual report and financial statements approval is made in the next step. Read more in the topic Digital submission of annual report.
The first time you use the signature
Our function Sign is used to sign the annual report. Before you can use it, you need to register an account. When you sign in for the first time, you also approve the connection.
-
Create and send your first signing invitation in Tax & Annual accounts.
-
After you've sent your first signing invitation, log in to your account and select Settings - Integrations.
-
Click Approve for Tax & Annual accountsin the list.
The link only needs to be authorised once and you do not need to log in again for the signing to work from Tax & Annual accounts.
How much does the signing cost?
It costs SEK 20 per signature. For example, if you have an annual report that needs to be signed by four members, the cost of signing is SEK 80. If you choose to invite people to sign via SMS, each SMS costs SEK 3. No start-up or other fixed costs. You only pay for what you use.
Under the headings /Annual general meeting protocol you will find the names and email addresses of the persons who are to sign. The names are automatically retrieved from the pages Signatures and Annual general meeting protocol - Basis.
Follow the steps below to sign the annual report and the minutes of the annual general meeting:
-
Double-check the email addresses of those who are to sign. If any are incorrect or missing, update them before sending the document for signing.
-
If an auditor is present at the signing, the order follows the list: First, person number one signs, then the email is sent to number two, and so on. The auditor signs last.
-
If there's no auditor, everyone receives the emails at the same time and can sign in any order.
-
From Sign settings - Sign within, select how long the signing should remain open. Reminders are then sent automatically at the interval you have selected.
You cannot change the validity period after the invitation has been sent. If, for example, you want to extend the time, you need to create a new invitation and delete the old one in the function Sign.
-
Use the checkboxes to select whether the signatories must read through the document and whether they should receive a copy via email.
-
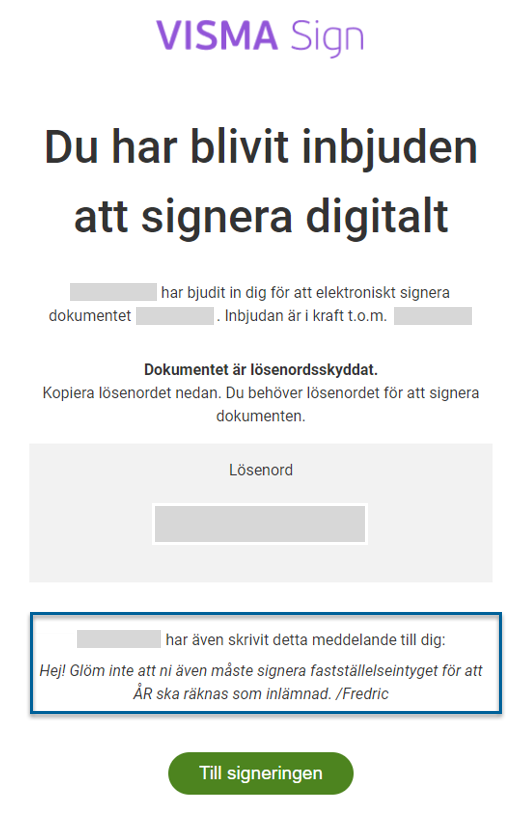
If you wish, you can add a personal message. It will appear at the bottom of the notification.
-
Click Send for signing to send the document.
When you click Send for signing, the signatories will receive an email and log in with BankID before signing. You can then see how each person is doing in the Status column.
The email with the notification looks like this. The text in the box is your personal message.
How do I know who has what role in the company?
In the company's registration certificate or when you are logged in to My Pages at Bolagsverket, you can see
- All persons registered in the company and their role
- Beneficial owner
- Authorised signatory
When the the annual report is sent for signing via Sign, the text Date is indicated by the digital signature will be displayed instead of a date. The same applies to the auditor's signature. In this case, the text On the date indicated by my (our) digital signature is displayed instead of the date.
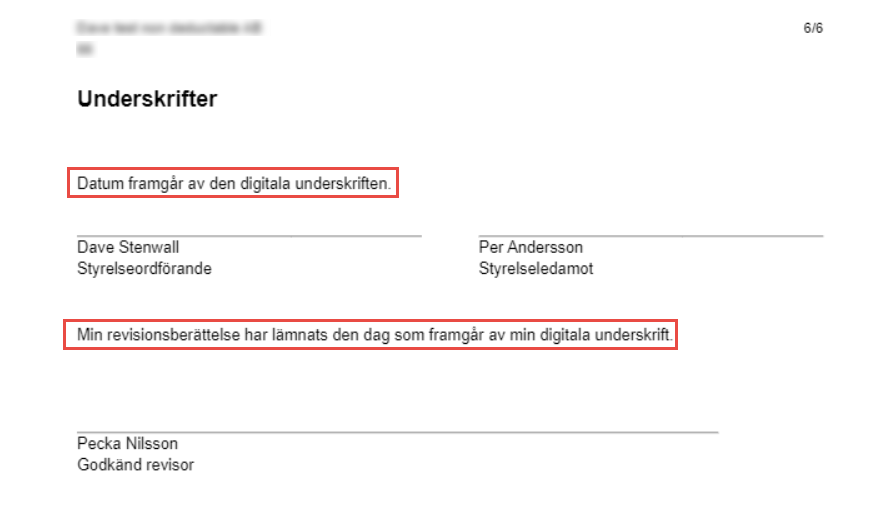
The texts replace the date when the annual report is sent for signing via Sign. You can preview this with the Preview button on the Digital sign page.
Cancel an ongoing sign
When you cancel a signing, it means that the collection of signatures is interrupted. The invited persons can no longer sign the document by following the link in the e-mail. You can do this as long as the document has not been signed.
-
Select Archive and open the document.
-
Click Cancel at the top right, and then confirm that you want to cancel by clicking Yes .
-
Click Delete .
If the invitation has already been signed, you can click Delete immediately. This will make the document disappear from your archive, but it will remain in the archives of everyone else who signed it and will remain legally valid.
Change e-mail address for a signatory
If you find that the e-mail address of a sigantory is incorrect and you don't want to resend a new invitation to all signatories, you can edit the e-mail address in Sign. You can do this as long as the invitation has not been opened by the signatory. If the invitation has already been opened, the edit option is not available.
In order to see the status of the sign, also make sure to update the e-mail address on the page - Digital sign.
-
Select Archive and open the document.
-
Click Edit on the line of the sigantory whose email address you want to edit.
-
Update the information.
-
Click Save .
After you have saved, the invitation email will be resent.
Related topics
Warnings and errors when checking the annual report
How to submit your annual report digitally - Bolagsverket
Vägledning till K2 - Årsredovisning i mindre företag (BFNAR 2016:10)
Guidance to K3 - Annual report and consolidated accounts (BFNAR 2012:1)


